What Is Protecting Excel Sheet?
Protect Sheet in Excel is a feature that locks the workbook using the protect option or using a password. It ensures that no other user can make changes to our worksheet, especially in a worksheet shared with multiple users.
The Excel Protect Sheet can be used in various ways where we can allow users to perform some tasks but not make changes, such as they can select cells to use an AutoFilter but can’t make changes to the structure, or select from the drop-down instead of adding or deleting data.
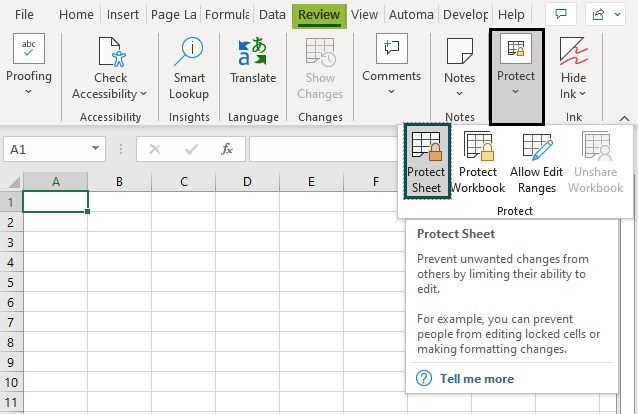
For example, to protect an Excel worksheet, we must select the “Review” tab – go to the “Protect” group – click the “Protect Sheet” option, as shown below.
Then, we can complete the further steps, and protect the sheet. However, protecting using a password is recommended.
Key Takeaways
- When multiple users work on a shared worksheet, we use the Protect Sheet in Excel feature to avoid any data modifications by other users.
- An Excel worksheet that is protected using a password and/or has the cells in the worksheet locked to prevent any changes is known as a “Protect Sheet”.
- When we select the “Locked” option, we can lock a particular cell or a worksheet, and Excel prevents users from making any changes.
- When we select the “Hidden” option on a cell with a value or a formula, Excel hides the formula associated with it, making it invisible in the formula bar. And we can uncheck or unselect it to make it visible once again.
How To Protect A Sheet In Excel?
The steps toProtect Sheet in Excelare as follows:
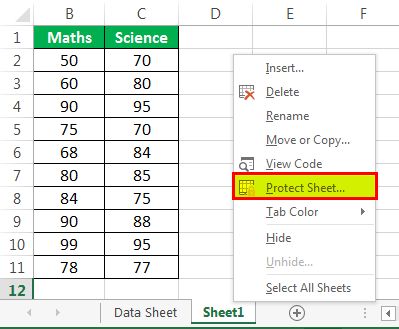
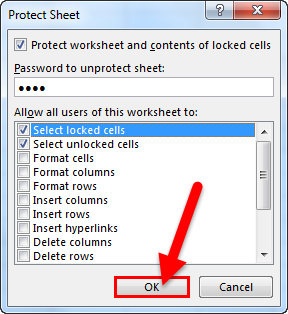
- First, open the worksheet you wish to save. Then, right-click the worksheet or go to “Review” and “Protect Sheet.” The option lies in the “Changes” group, then click on “Protect Sheet” from the list of options displayed.

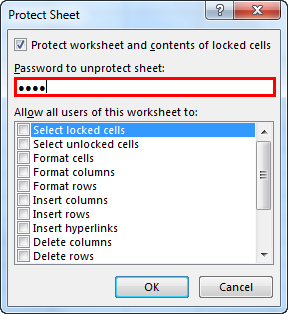
- It will prompt you to enter a password.

- Insert the password as per choice.
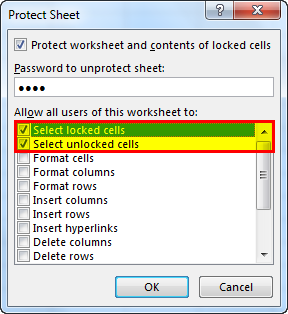
- The section below displays a list of options you can allow the users of the worksheet to perform. Every action has a checkbox. Check those actions you wish to enable the worksheet users to complete.
- If no action is checked, the users may only VIEW the file and not perform any updates by default. Click “OK.”
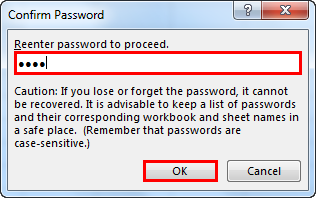
- Re-enter the password as prompted on the second screen, and click “OK”, as shown.


How To Protect Cells In An Excel Worksheet?
The steps to Protect Cells in an Excel Worksheet are as follows:
- Step 1: Right-click on the Excel cell you wish to protect. Then, select “Format Cells” from the menu displayed.

- Step 2: The “Format Cells” window appears. Here, go to the tab named “Protection.”
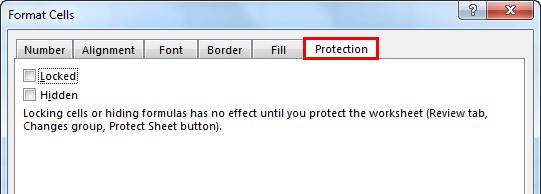
- Step 3:
- Check “Locked” to lock a particular cell in Excel. It will prevent the cell from editing, and we can only view the content.
- Check “Hidden” to hide the cell. It will hide the cell, and so the content is invisible.
How To Hide The Formula Associated With A Cell?
The steps to hide the formula associated with a cell are as follows:
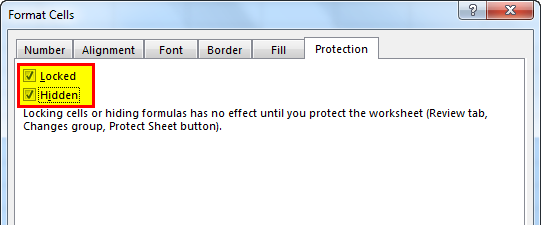
- Step 1: As shown below, cell F2 has a formula: D2+E2 = F2.
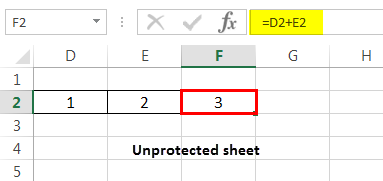
- Step 2: The “Protection” tab of the “Format Cells” shows that the Excel cell is protected, because both the “Locked” and “Hidden” options are checked.

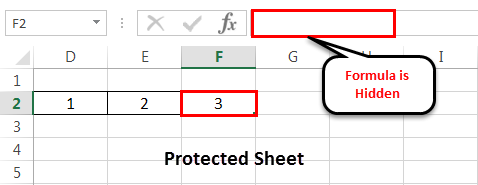
- Step 3: As a result, the formula is hidden / not visible in the formula bar, as shown below.
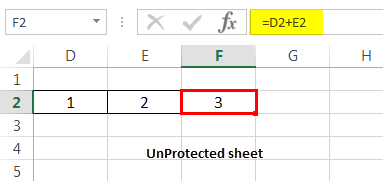
- Step 4: Upon unprotecting the sheet, i.e., when we uncheck the “Locked” and “Hidden” options, the formula also starts appearing in the formula bar, as shown below.
Pros And Cons Of Protect Sheet In Excel
#Pros
- A protected Excel sheet with a password is used to secure sensitive information from unwanted changes done by unauthorized entities.
- Excel worksheet cell actions are access controlled. It means they can be configured to be available for some users and not others.
#Cons
- If you protect an Excel sheet with a password, and if it is forgotten, it is non-recoverable. It means there is no automated or manual way of resetting or recovering the old password. It can cause data loss.
Important Things To Note
- The password of the protected sheet is case-sensitive and is non-recoverable.
- If no actions are checked in the “Protect Sheet” dialog window, the default accessibility is “View.” It means the others can view the protected worksheet and cannot add new data or make any changes to the cells in the worksheet.
- Protecting the sheet is mandatory to protect the cells as locked or hidden.
- If the sheet is unprotected in Excel, all the formatting/locking associated with the cells would be overridden/gone.
Frequently Asked Questions
1. What is the purpose of Protecting sheet with a password?
To prevent users from accidentally or purposely making any modifications to the cells, worksheets, or the structure of the workbook, we can Protect the cells, worksheets, or workbook, respectively, by locking them with or without a password to in the Excel worksheet.
2. What are the different methods to Protect Sheets in Excel?
There are three protection categories, as shown in the image below.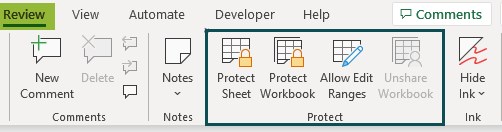
• Protect Sheet – It protects a particular worksheet from unwanted changes made by users by limiting their editing chances. If we want to protect multiple worksheets at a time, it is not possible. However, we can go to the necessary worksheets, one at a time, and protect sheets.
• Protect Workbook – It protects the entire workbook, i.e., Excel files worksheets. Here, users cannot make structural changes like adding, moving, or deleting worksheets.
• Allow Edit Ranges – It helps users to edit some cell ranges that are not password protected.
3. How to open the “Format Cells” window to Protect Cells or Hide Formulas?
There are various methods to open the Format Cells window, namely,
• Method 1 – Simply press the shortcut key “Ctrl+1”.
• Method 2 – Select the “Home” tab – go to the “Number” group – click the “Number Format” option drop-down – select the last option “More Number Formats…”, as shown below.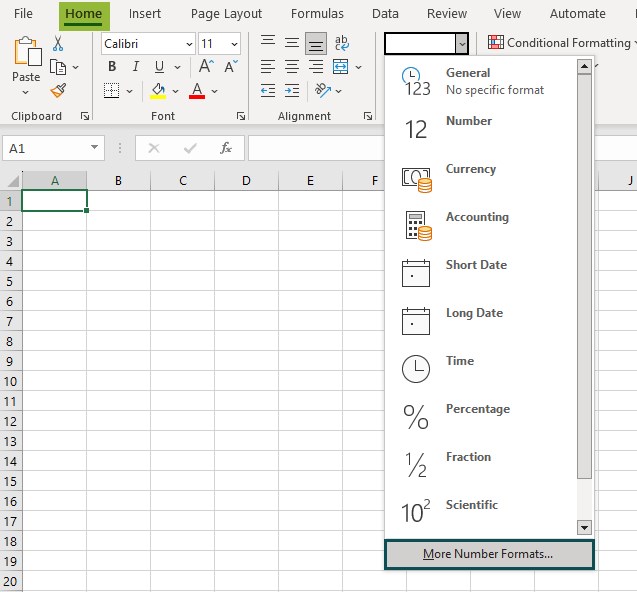
• Method 3 – Right-click on any cell, and select the “Format Cells…” option from the list, as shown below.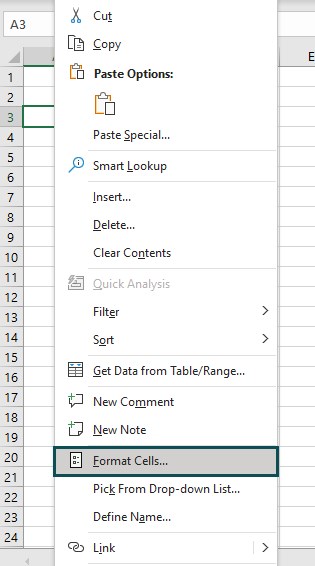
• Method 4 – Select the “Home” tab – go to the “Number” group – click the “Number Format” box, i.e., the small box at the bottom right of the “Number” group, as shown below.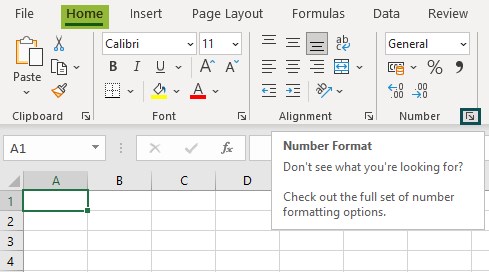
Recommended Articles
This article is a guide to Protect Sheet in Excel. Here we lock, hide, protect sheets, files, cells, with or without password, examples & downloadable template. You may learn more about Excel from the following articles: –